How to Build a Command-Line Application with Typescript and AdonisJS Ace

This article shows you how to build a command-line application using typescript and @adonisjs/ace. The command-line application accepts user input and makes a request to the numbers API. The request returns an interesting fact about the number.
To begin you need Node.js and npm installed on your machine, npm comes together with Node.js. Basic knowledge of typescript is also advised although not necessary.
The code in use can be found in this repo.
Installation
- We run
npm init -y. It sets up a new Node.js project in the current folder with the default details without asking any questions. - We install typescript globally using
npm install -g typescript. Next, we set up a new typescript project by running the commandtsc --init. Thetsc --initcommand creates atsconfig.jsonfile.
Open the generatedtsconfig.jsonfile and update the following details"target": "es2015", "outDir": "./dist", "rootDir": "./src",rootDirdescribes the root directory that typescript will compile from. The keyoutDirdescribes the directory to save the compiled file. The keytargetdescribes the lowest level to compile the code to. - We install AdonisJs Ace which is a tool for creating command-line applications in Node.js
npm i --save @adonisjs/ace - We install type definition for Node.js, that allows you to use global values like process, require etc. in typescript.
npm i --save @types/node
Creating the Shebang
According to Wikipedia
In computing, a shebang is the character sequence consisting of the characters number sign and exclamation mark at the beginning of a script. It is also called sha-bang, hashbang, pound-bang, or hash-pling.
The Shebang tells the operating system what interpreter to use in running the script. To create the shebang:
- We create the
srcfolder, in the project root folder. - We create a folder called
binin thesrcfolder. - We create a file we will call
numb-cli.ts. - We paste the shebang by pasting the line below.
#!/usr/bin/env node

console.log('Welcome')
- We update the package.json file by adding the key-value pair.
"bin": {
 "numb-cli": "dist/bin/numb-cli.js"
},
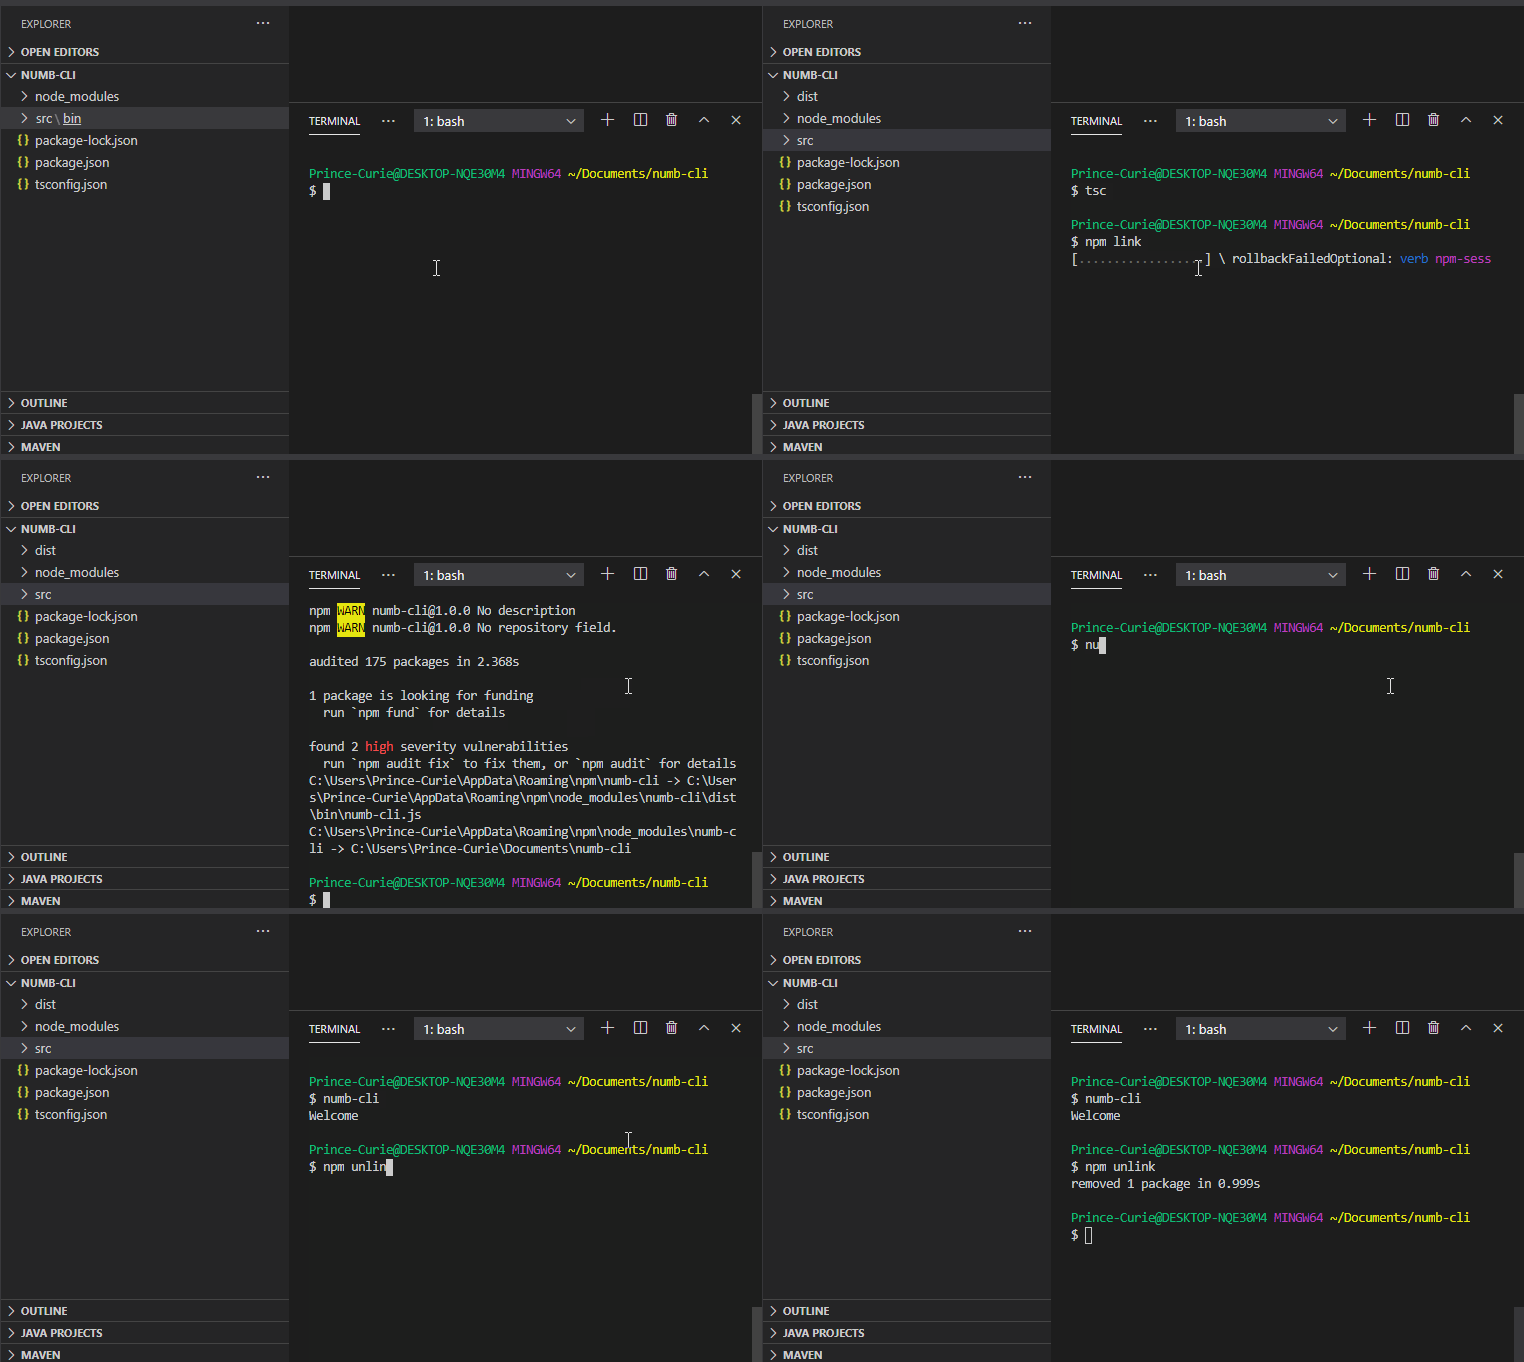
Testing the Shebang
To test if the shebang is working, - We compile the typescript file into javascript by running the command
tscon the terminal. - We install the package globally by running the command
npm link - We run the package by running the command
numb-cli. - It should return the response Welcome.
N.b: To uninstall the package, use the command
npm unlink.
Create index.ts file
After testing the shebang, we add the line import ".."; in place of console.log('Welcome'). The new line will import the index.ts file, which we will create in the src folder.
In the package.json file we update, the value for the key "main" with "dist/index.js",.
So the package.json file becomes:
{
  "name": "numb-cli",
  "version": "1.0.0",
  "description": "",
  "main": "dist/index.js",
  "scripts": {
    "test": "echo \"Error: no test specified\" && exit 1"
  },
  "bin": {
    "numb-cli": "dist/bin/numb-cli.js"
  },
  "keywords": [],
  "author": "",
  "license": "ISC",
  "dependencies": {
    "@adonisjs/ace": "^5.0.8",
    "@types/node": "^14.14.7"
  }
}
And the src/bin/numb-cli.ts becomes:
#!/usr/bin/env node

import "..";
In the index.ts file, we import ace, and set it up to execute commands
import ace from '@adonisjs/ace';

ace.wireUpWithCommander()
ace.invoke()
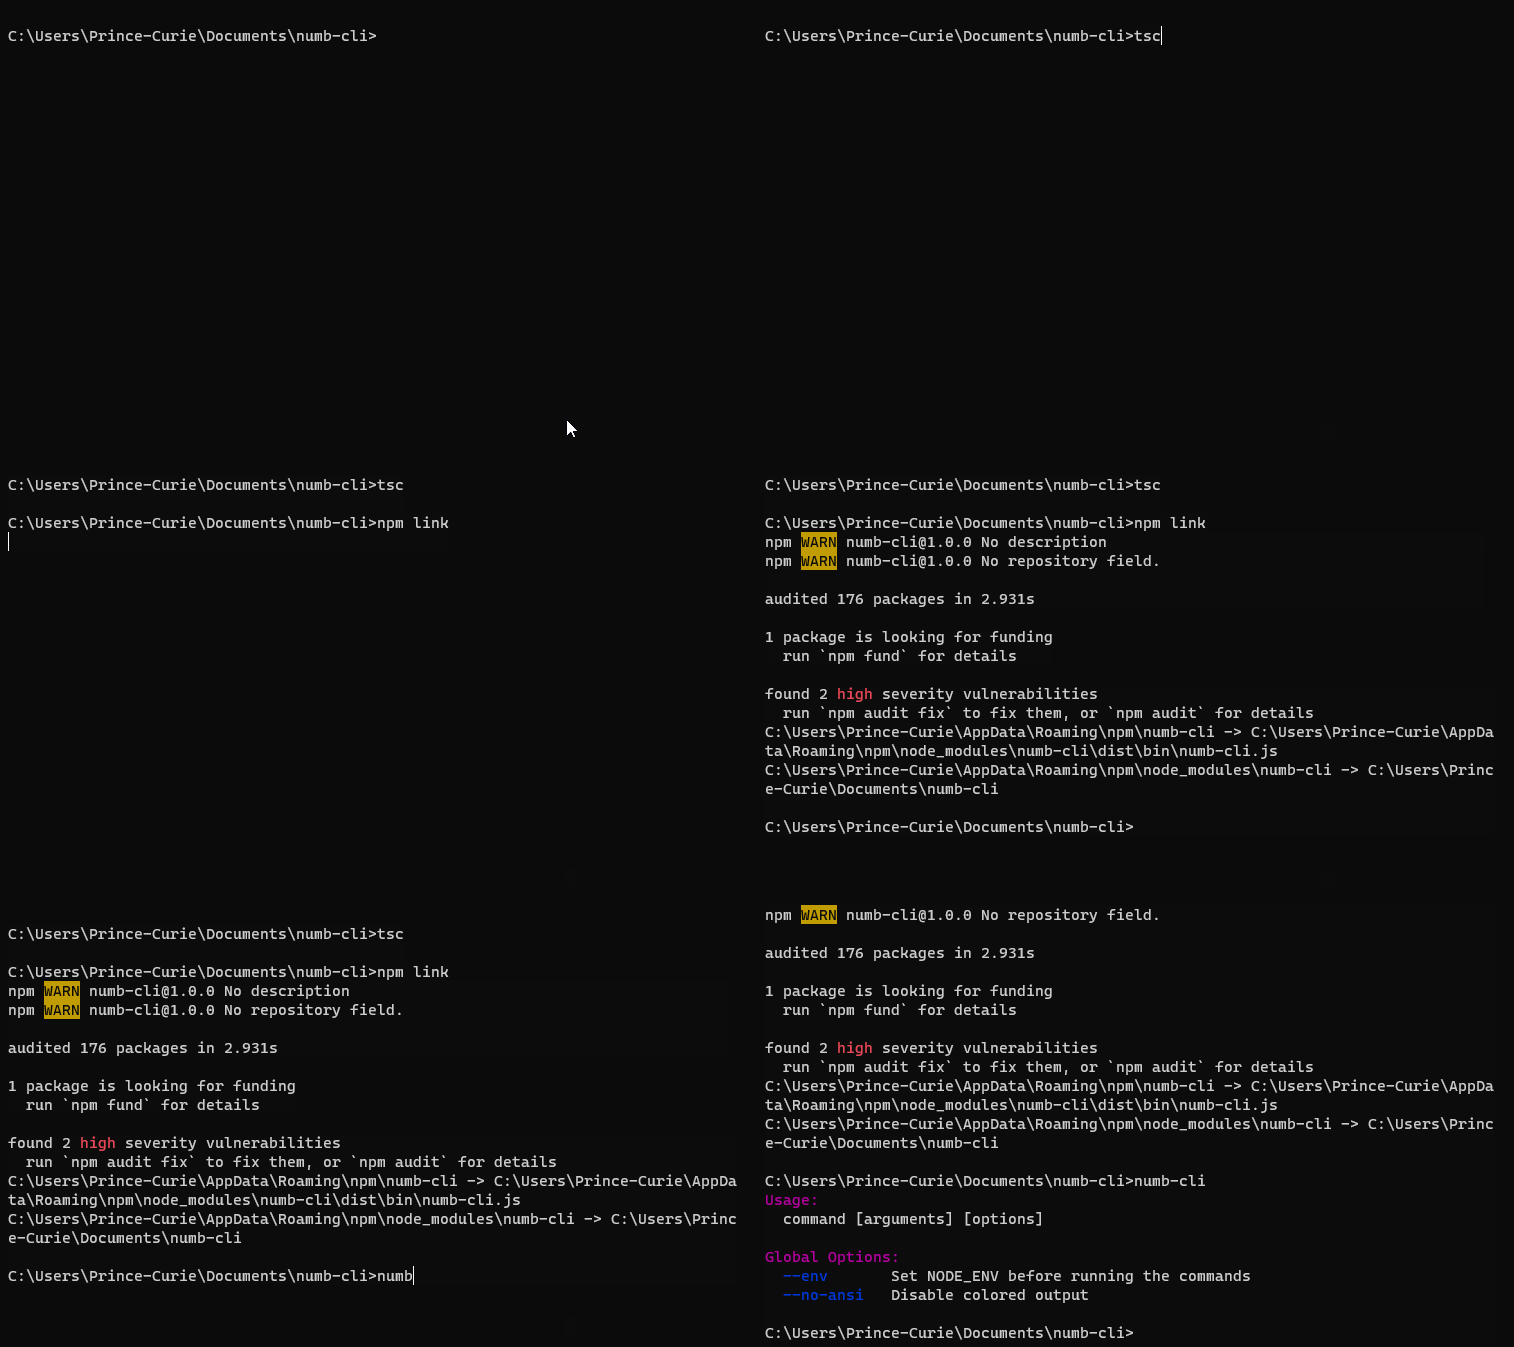
This should work when tested, but the @adonisjs/ace package has no type definition so it will not compile the typescript to javascript.
Let us create a declaration file for @adonisjs/ace.
Creating declaration file
At the root of the src folder:
- Create a folder called
@adonisjs - Create a file called ace.d.ts
- Paste in the line
declare module '@adonisjs/ace';On testing, a response like the one below will appear.
Creating commands
To create commands, we extend the ace command class. The new class enables us to overrides the signature, description and the handle method.
- Signature method: The signature method is a getter that returns the name of the command
- Description method: The description method is a getter that returns a description of the command.
- Handle method: This is a method that is called when we call the command. It is an asynchronous method. It accepts two (2) parameters which are not compulsory,
- args
- options
We register the new command by passing it as a parameter to the
ace.addCommandmethod, which we call in thesrc/index.tsfile.
The src/index.ts file becomes
import ace from '@adonisjs/ace';
import Random from './commands/Random';

ace.addCommand(Random);

ace.wireUpWithCommander();
ace.invoke();
We will call the command subclass Random and keep it in a Random.ts file in the commands folder. The Random.ts file will contain:
import {Command} from '@adonisjs/ace';

class Random extends Command {
    static get signature ():string {
        return 'random';
    }

    static get description ():string {
        return "Returns a random fact about a number";
    }

    async handle () {
        console.log('Welcome');
    }
}

export default Random;
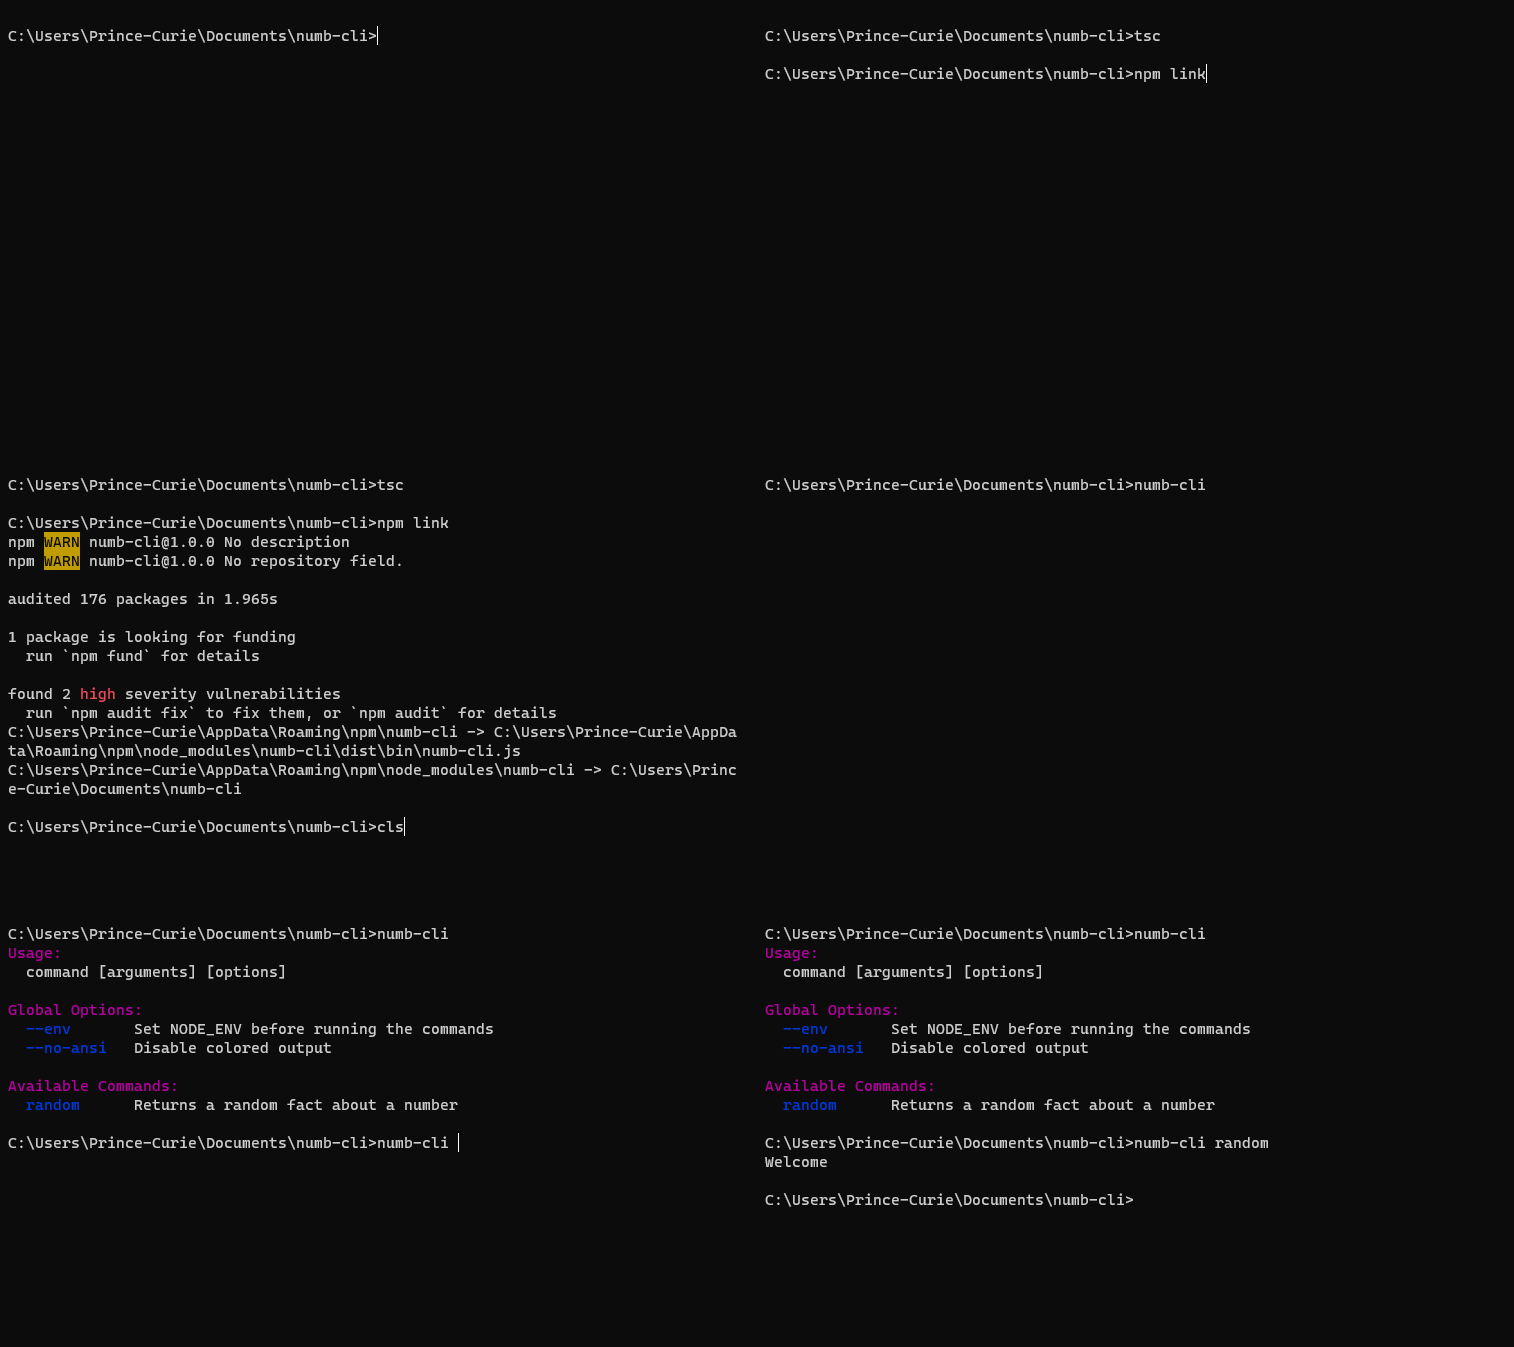
On testing the created command we get
Asking questions
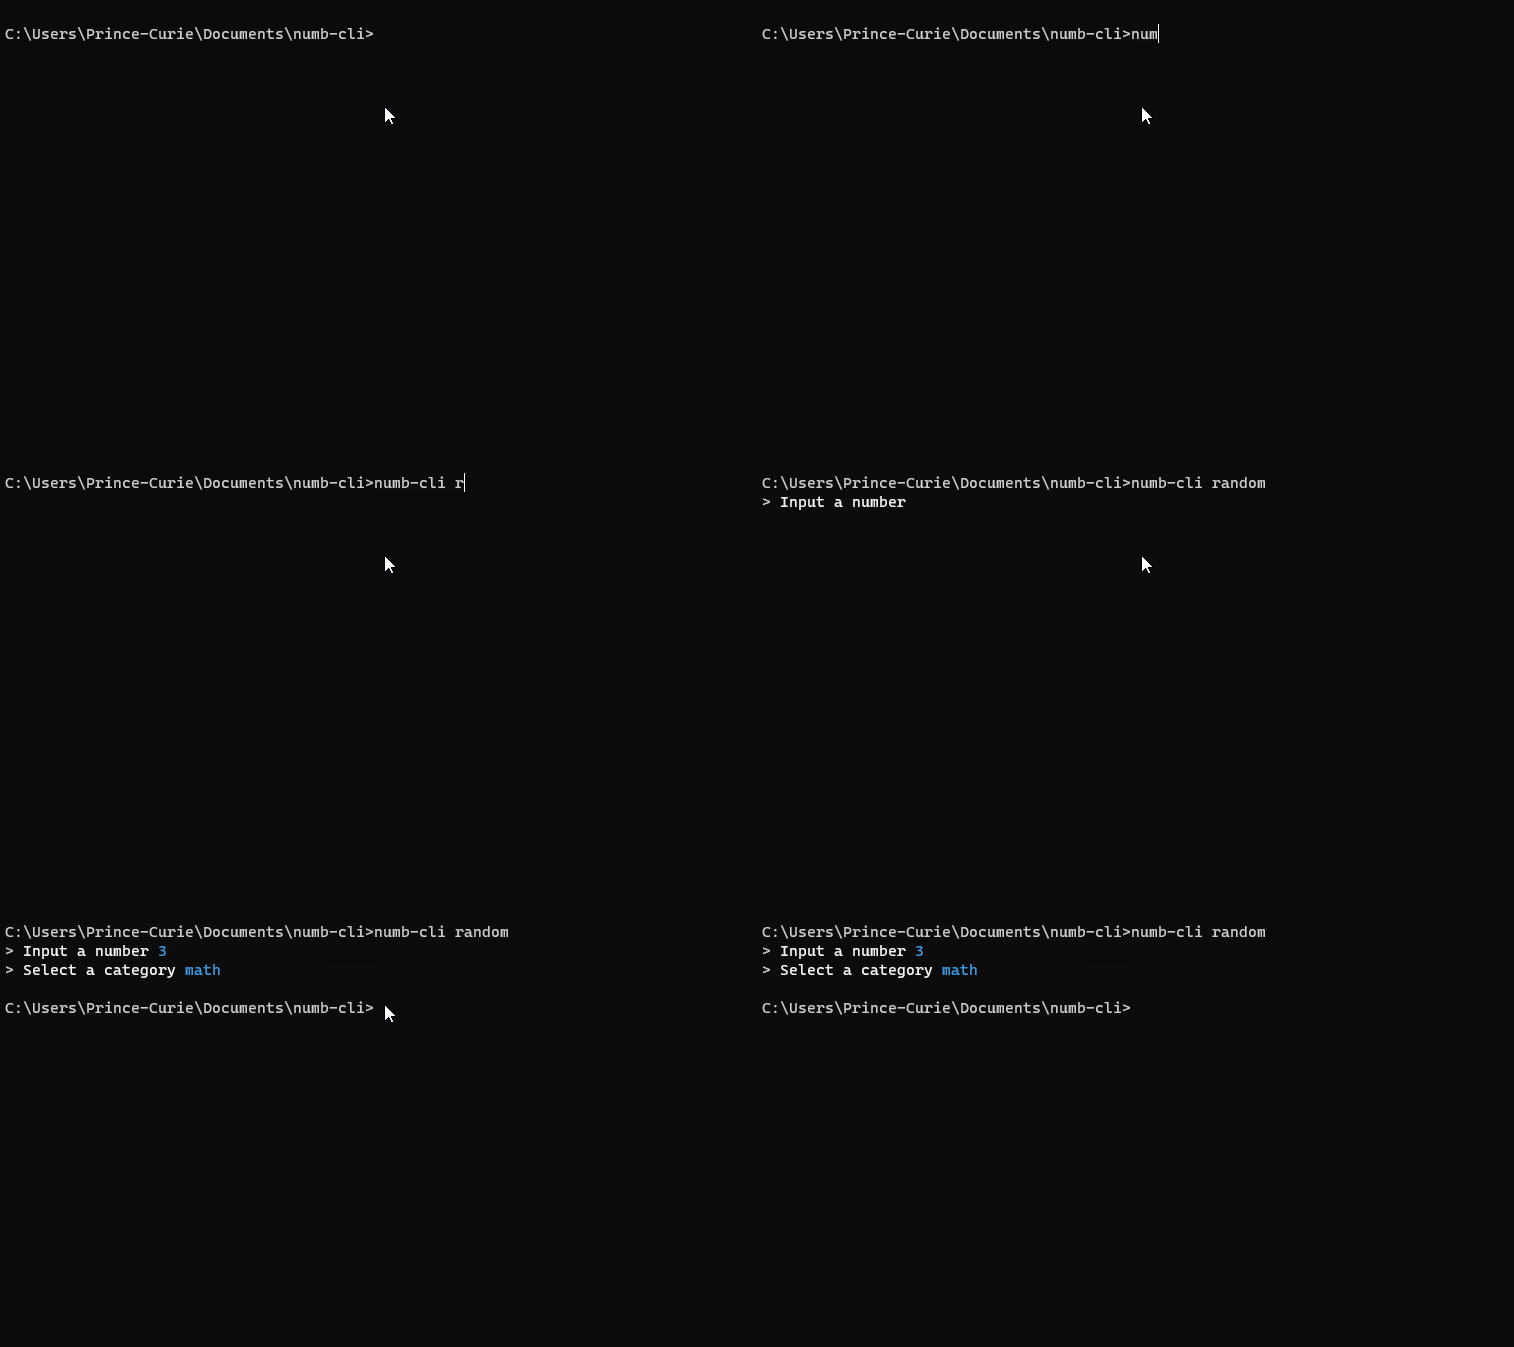
@adonisjs/ace provides methods to ensure that interaction with users occurs. To interact with users, we will use the ask and the choice method amongst others. The ask method accepts the question and a default answer which is optional as parameters. It allows a user to input a response to the question asked. The choice method accepts 3 parameters, a question, an array of options to choose from and an optional default option. Using the two methods mentioned above, we ask the users what number he/she wants a random fact about and what category the random fact will be about.
The code in the Random.ts file will look like this:
import {Command} from '@adonisjs/ace';

class Random extends Command {
    static get signature ():string {
        return 'random';
    }

    static get description ():string {
        return "Returns a random fact about a number";
    }

    async handle () {
        const number:number = await this
            .ask('Input a number')

        const category:string = await this
            .choice('Select a category', [
                'trivia',
                'math',
                'date',
                'year'
            ]);
    }
}

export default Random;
Testing the CLI should return:
Making an HTTP request
There is a need to use the details gotten earlier from the user in other get the random fact. @adonisjs/ace does not have the capability to make an HTTP request. To make an HTTP request we install the got NPM package.
npm i got
The command above installs got as a dependency.
Next, we import got into the Random.ts file.
import got from 'got';
In the handle method of the Random class, we make an HTTP get request to the URL that returns the fact.
const url:string = `http://numbersapi.com/${number}/${category}`

const response = await got(url);
Displaying response
At this point, the user needs to see the random fact. This is possible with either the methods provided by @adonisjs/ace Command class or with the use of methods of the Console class. The @adonisjs/ace methods each give the displayed text to a unique colour. With the console methods, the text becomes beautiful using the this.chalk method of the Command class. this.chalk accesses an instance of kleur offering flexibility to the user.
We add Icons to the displayed response by using the this.icon
method of the Command class and passing one of the acceptable parameters which are:
- success
- error
- info
- warn
Each of this parameter represents a particular colour and an icon.
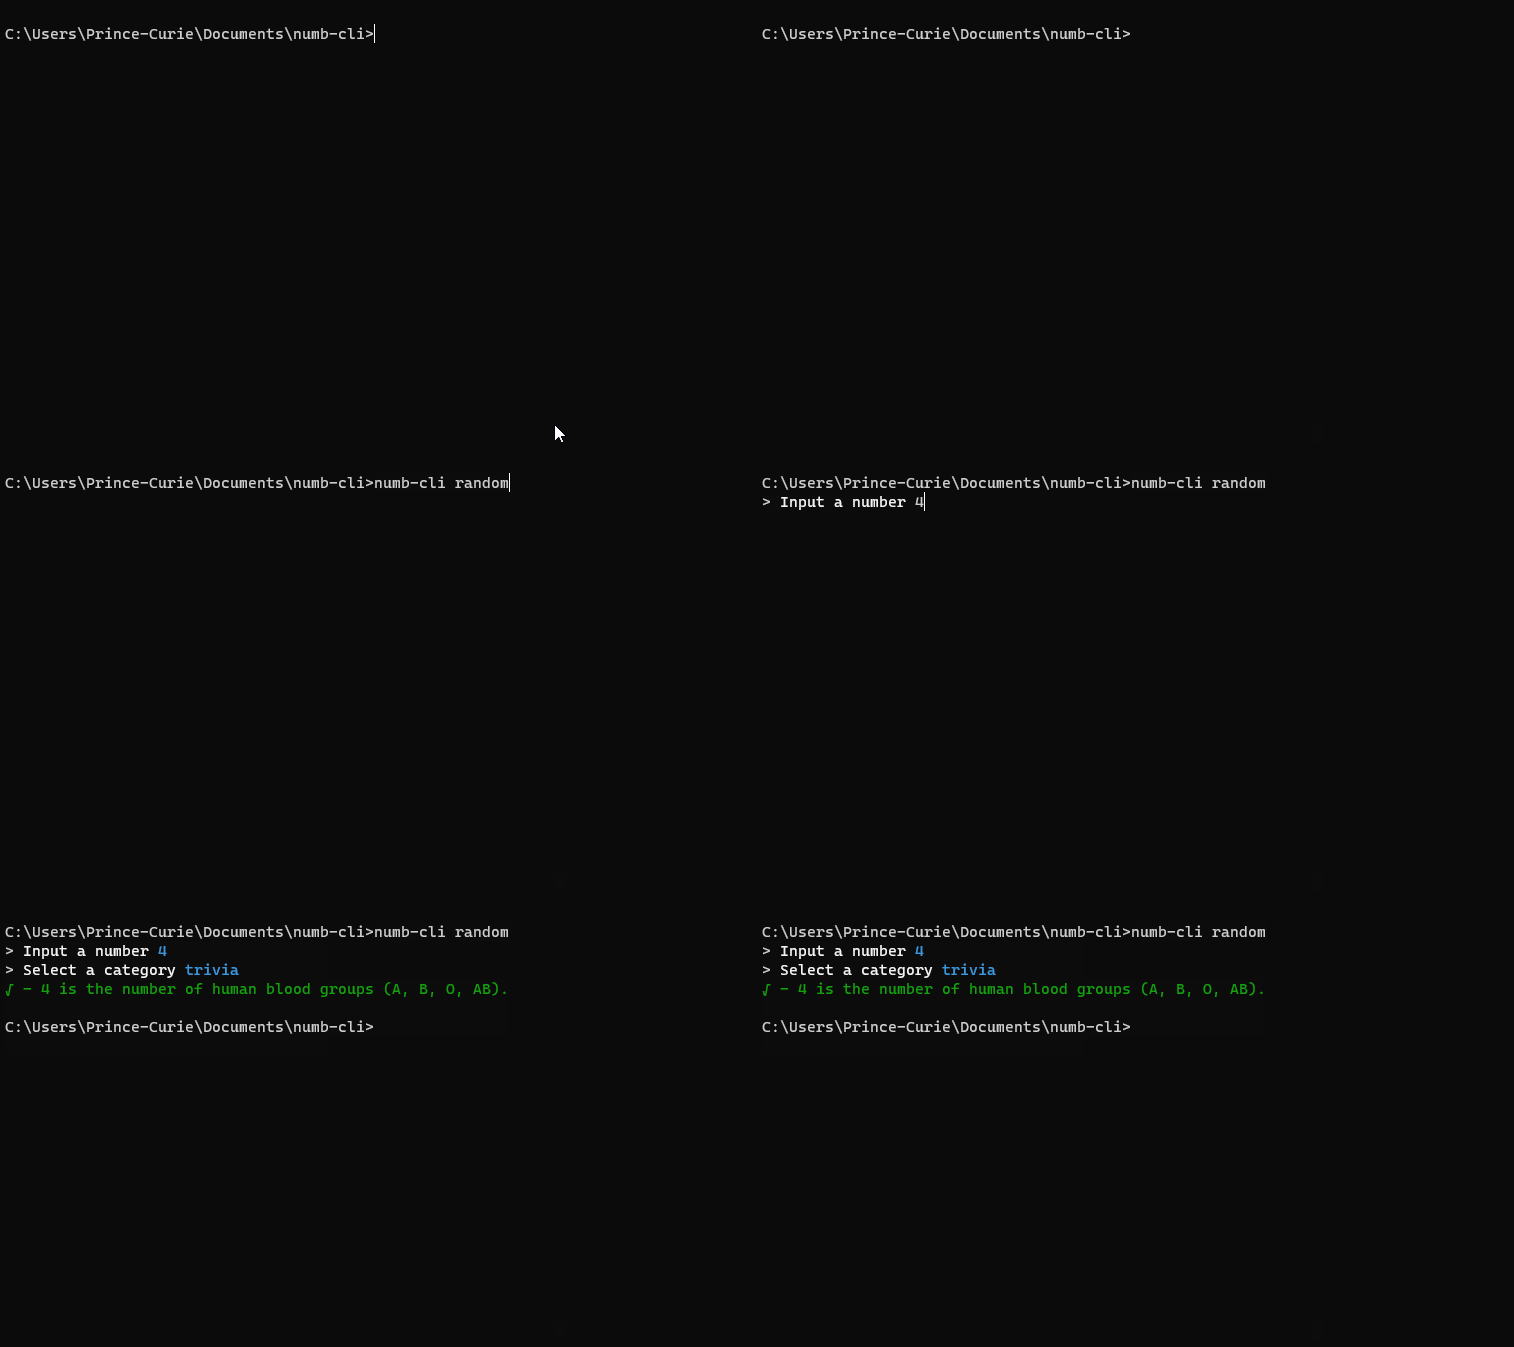
For the CLI we add the snippet below to display other response as well our icon
this.success(`${response.body} - ${this.icon('success')}`);
Handling exceptions
We have built the CLI this far:
- Creating a command;
- Asking questions;
- Accepting responses;
- Making an external HTTP request;
- Getting back results;
- Displaying the results to the user.
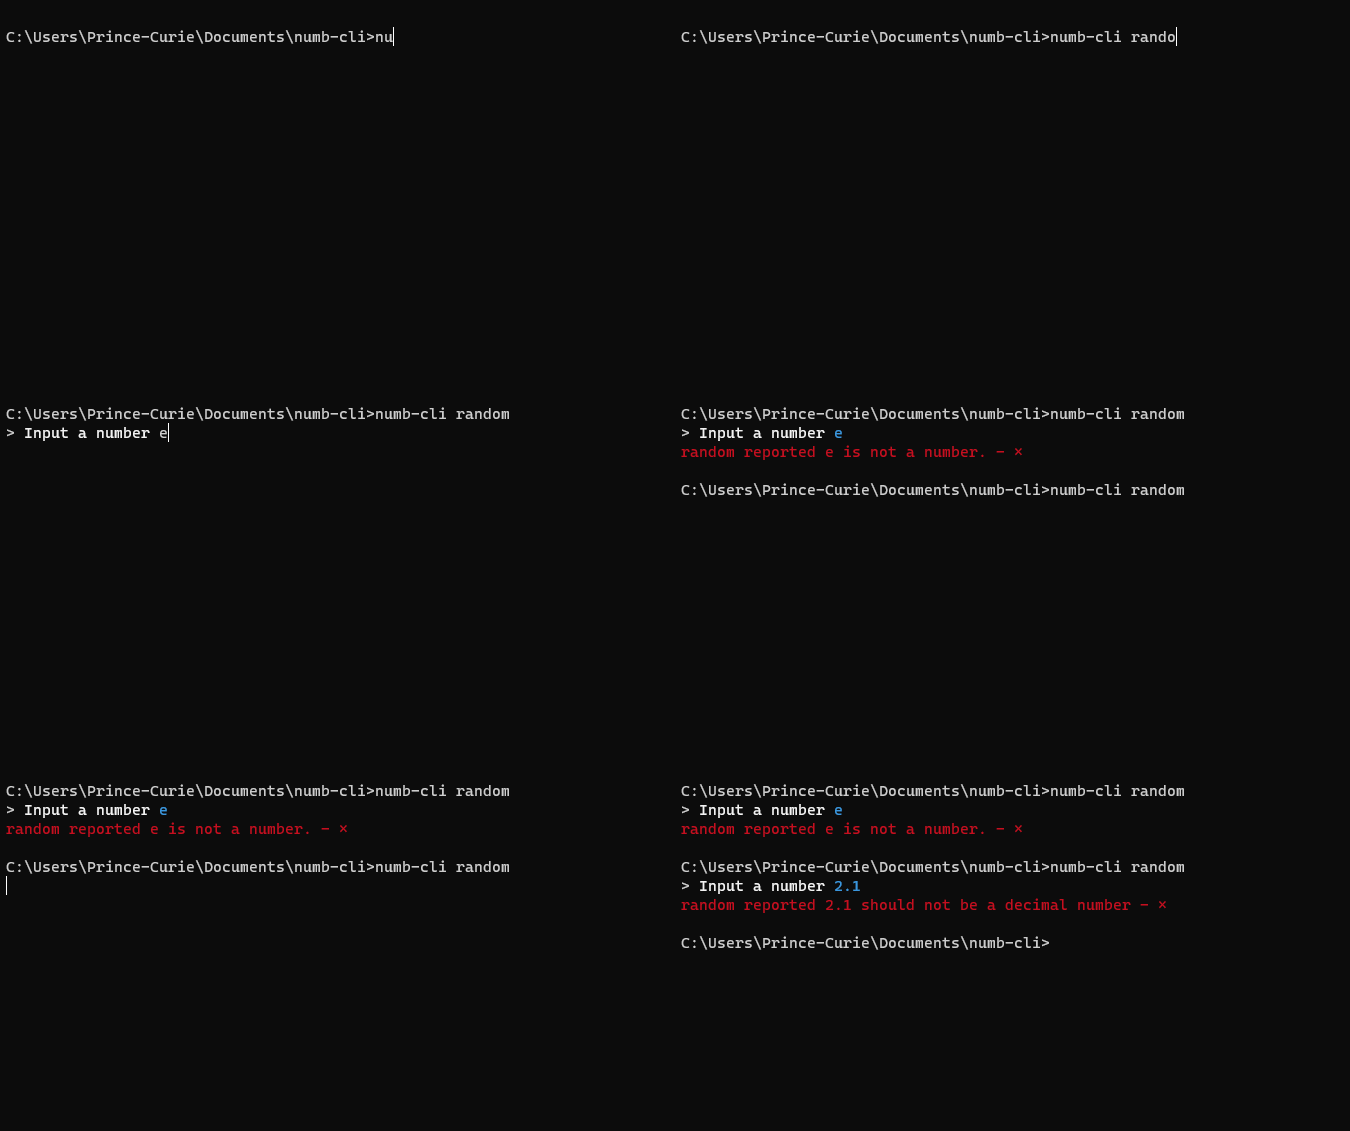
But what if there is an exception since we did not confirm user input and other errors that may occur from making an external network call.
To handle this @adonisjs/ace provides an event listener onError. The onError listens for exceptions, notes the command that throws it, and passes the exception and the command to a closure function. The closure function is where we display the error message from and stop the running process.
The onError listener is a method of the ace class and is placed in the index.ts file.
Since the use of icons and colourful text displays works as methods on the command class. We create an instance of the Command class so we can use its methods.
To throw an exception we check the user input ensuring it is a whole number. So in the handle method of the Random class, we add these checks:
// check if number is of datatype number
if(isNaN(number)) {
    throw new Error(`${number} is not a number.`)
}

// ensures that number is not a float
if(number % 1 != 0) {
    throw new Error(`${number} should not be a decimal number`)
}
The index.ts file becomes:
import ace, {Command} from '@adonisjs/ace';

interface ErrorMessage {
    message: string;
}

const command = new Command()

ace.onError(function (error:ErrorMessage, commandName:string) {
    command.error(`${commandName} reported ${error.message} - ${command.icon('error')}`)

    process.exit(1)
  })
The interface ErrorMessage used above ensures the datatype of keys within the error object. So it becomes the datatype for the object.
Conclusion
This article explains how to build a Nodejs CLI using typescript and @adonisjs/ace. Always remember to compile to javascript before running and to always unlink before linking back when testing a new update. Finally, the code in the index.ts file will be:
import ace, {Command} from '@adonisjs/ace';
import Random from './commands/Random';

ace.addCommand(Random);

interface ErrorMessage {
    message: string;
}

const command = new Command()

ace.onError(function (error:ErrorMessage, commandName:string) {
    command.error(`${commandName} reported ${error.message} - ${command.icon('error')}`)

    process.exit(1)
  })

ace.wireUpWithCommander();
ace.invoke();
and the class in the Random.ts file will be:
import { Command } from '@adonisjs/ace';
import got from 'got';

class Random extends Command {
    static get signature ():string {
        return 'random';
    }

    static get description ():string {
        return "Returns a random fact about a number";
    }

    async handle () {
        const number:number = await this
            .ask('Input a number')
        if(isNaN(number)) {
            throw new Error(`${number} is not a number.`)
        }

        if(number % 1 != 0) {
            throw new Error(`${number} should not be a decimal number`)
        }

        const category:string = await this
            .choice('Select a category', [
                'trivia',
                'math',
                'date',
                'year'
            ]);

        const url:string = `http://numbersapi.com/${number}/${category}`

        const response = await got(url);

        this.success(`${response.body} - ${this.icon('success')}`);
        process.exit(0)
    }
}

export default Random;
To learn more about @adonisjs/ace you can check the official documentation here.
@adonisjs/ace also has the ability to work with the filesystem and the database. I hope this helps as a starting point in showing how to use the @adonisjs/ace and also how to use it with typescript.
If you have come this far thanks for reading. Kindly drop your comments in the comment section.
Comments
Join the discussionNo comments yet. Be the first to comment.

